Category Archives: Assignment 4 – Applying lighting techniques

Tutor’s report and my reflections on Assignment 4

Back_lighting_3852-2-resized

I have received my Tutor report and I am both relieved and pleased that my work was well received and met the criteria.  Tutor Report Shaun Mullins 512659 asst 4 TAOP

I chose portraits as this is where I expect to specialize as a professional photographer and my wife was the willing (if not long suffering) model.

I considered this section and assignment the most important part of the course for the very reason that knowledge, understanding and control of light must be key to a good photographer.  Without the appreciation of this subject a photographer is likely to be relying on luck rather than judgement for a good image, this maybe Okay for a casual amateur perhaps but when you are taking somebodies money then you are expected to know what you are doing and to be consistent with your standard of work.  Therefore, I felt that I needed more time on this subject and I now feel much more confident in this very important area of photography.

Like everyone else I am confined to budget constraints and I am currently unable to invest in very expensive lighting equipment.  However, I have found that I can get by for the time being using cheaper speedlights and Pocket Wizards.  You can obtain reasonably good speedlights for around £60 each and the main expense is the Pocket Wizards (although cheaper options are available).  I like to look to the longer term when choosing equipment, the speedlights will always come in handy and the Pocket Wizards are both reliable and compatible with more expensive lighting equipment.  I took a piece of advice from one of the authors of my books on lighting, he stated that before purchasing a second speedlight buy a hand held light meter first.  This piece on investment will carry forward for when I have the chance to use larger more professional strobes.

Michael suggests that I could have extended my creativity by applying a more visually creative context such as emotion to the my work to link the images in to a context.  Yes, on reflection this was a good idea and when I was first concentrating on texture I originally was thinking along similar lines for the theme of soft and hard but I got worried that I was departing from the basic required criteria.

DSC_4793-sharp_hard-resized

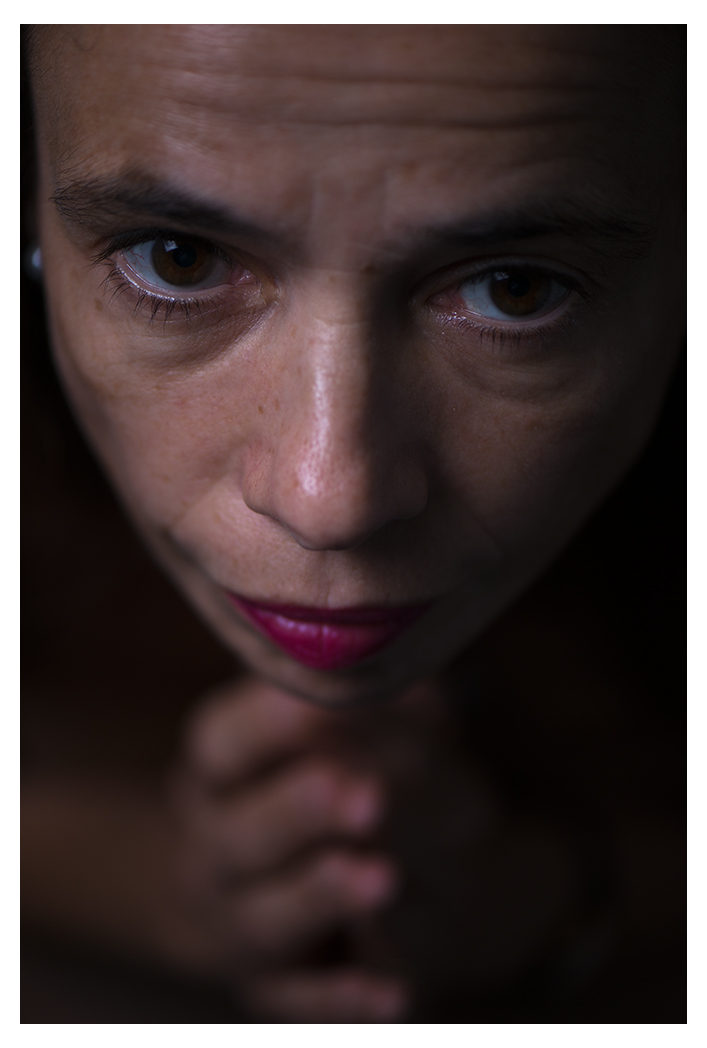
85mm f/1.4, 1/250sec, f/3.2, ISO-125, WB-tungsten, remote flash with tungsten Gel 1/64.  Image taken over Sarah’s shoulder of her reflection in bathroom mirror.  Speedlight 2′ to Sarah’s  left on the sink unit pointed up to her face controlled with a Pocket Wizard.

This image was my first attempt at “hard” and was intended to produce a more emotional feel; but I was concerned that I was not creating texture but mood and that wasn’t the brief; so I decided to play it safe and simply create an un unflattering portrait with an obvious visual texture as per the brief.  Perhaps, with more thought and planning I could achieve both but my priority was to finish my assignment on time.

Shape – image 1.

Profile_shape_DSC_3783-resized

This image needed to be a little sharper with the forehead darkened with just edge lighting and for the top lip under the nose.

Form – image 4

DSC_4618-form-1-resized

Michael comments that the highlight on the nose competes with the whites of the eyes.  An interesting observation that I had not considered and clearly I need to start looking more critically at my work to help my learning curve and improve on a polished piece of work.  This image could be improved in Photoshop to brighten / burn the whites of the eyes and perhaps dodge the highlights on the nose.  However, in my defence, if I had noticed this I may have been tempted to use Photoshop and this would have been cheating.  I have kept adjustments to a minimum in order to demonstrate my newly acquired knowledge.  Having said that I probably will now have a play in Photoshop to improve this image as my Photoshop skills are still very basic and needs improving with practice.

Colour – image 8

DSC_4692-Edit-resized  DSC_4103-Tricolori-resized

Mike tells me that I could have got away with using the second image here with Italian flag concept; but I am glad of my final choice as it has thrown up a very useful and important learning issue for me.  That of differences of colour reproduction between the printed image and the screen image.  I have read about this subject and I regularly re-calibrate my screen using a colour spyder however, my mistake was to simply get prints made at my local Tescos that has a photo printing facility.  The resulting print produced an excess yellow in the skin and hair as the printers defaults did not match the colour profile of the photo and I did not consider this when getting it printed.  If I had used the Italian flag image this may not have been highlighted and a learning opportunity would have been missed.  This is an area I still don’t yet fully understand but is clearly an important subject to learn and fully understand if I am to be able to obtain and provide quality end results.

My thanks to Mike for his valuable and generous comments.

Assignment four – Applying lighting techniques

The Brief

In this assignment I am using the various lighting techniques that I have learned in order to create a selection of images that bring out particular physical properties of the same object.  I have chosen to make a portrait study of my wife as my chosen subject to photograph for this assignment.

Back_lighting_3852-2-resized Profile_shape_DSC_3783-resized DSC_4584-form-resized DSC_4618-form-1-resized DSC_4657-soft-resized DSC_4793-a-hair-resized DSC_4434-Candle-light-resized-a DSC_4692-Edit-resized

Shape

 Back_lighting_DSC_3862-2-resized

Sarah wearing a Cloche hat. 105mm f2.8, 1/250sec f/3, ISO-50.

Shape – What defines shape?

A shape is an object that stands out from it’s surroundings, in order to be seen or notices, it has a definable edge to it but it may not have much detail.  Indeed an object with a defined edge and very little or no detail is nothing more than a shape.  However, a shape has to have some quality that offers some clue as to it’s identity or otherwise it may as well be described as – and simply called – a blob.

Chosen images

Profile_shape_DSC_3783-resized  Back_lighting_3852-2-resized

I chose these two images to submit for assessment as I felt that both of these pictures define shape very nicely and interestingly.

My first image has Sarah looking info the picture towards the negative space.  The image has been lit to provide just enough information so as to the identity of the subject using the contrast of highlights against the dark background to define the faces edge and shape.

Profile_shape_DSC_3783-resized

Sarah in edge lighting was photographed against a black back ground with two naked speed lights set on stands behind her, one to her left and one to her right, both above her and angled down towards her at 45 degrees.  The lefts light was set at 1/32 and the right set to 1/64 and both operated via the camera using Pocket Wizards.  The camera was set on a tripod with a cable release for tripping the shutter, 105mm f/2.8 lens, f/8, 1/125 sec, ISO 125. Small adjustments made to sharpness and tonal contrast in Lightroom.

My second is Sarah one of her favourite hats.

Back_lighting_3852-2-resized

Sarah in the hats was taken against a white back cloth illuminated by two speed lights in soft-boxes in order to evenly spread the light across the screen behind Sarah.  The speedlights were both adjusted to 1/16 and controlled by Pocket Wizards.  Ideally I would have liked to have included a black screen behind the camera but I did not have enough space in my dinning room.  I compensated by adjusted my ISO to ISO 50 and to be sure the back ground was as neutral as possible I used the f/3 for minimum depth of field, shutter speed 1/250 sec.  105mm, f/2.8 lens, tripod mounted camera and the shutter tripped using a cable.   Some small adjustments were made in Lightroom to sharpen the image, and add additional tonal contrast.  My choice was between this and the cloche hat to submit; and although the cloche hat produces a simple cameo effect I preferred this ‘ascot’ hat had image which retains some additional detail in tones for the hat.

Form

Describing an objects three dimensional form and or it’s volume.


DSC_4584-form-resized

85mm f/1.4, 1/250sec, f/5.6, ISO125, 3 x speedlights operated via pocket wizards, soft-box and reflectors.

In this high key image Sarah’s pose appears to be coming out of the picture frame.  For a backdrop I used a white sheet illuminated by two speedlights in soft-boxes to evenly light it and set it back about 1.5m from Sarah in order to maximize the benefit of a shallow depth of field to loose any folds/creases that might otherwise show up.  The main key light was a speedlight set to 1/64 in a 24 x 24 soft-box above and 45 degrees to Sarah’ s right (left of the picture) and a white reflector set on a stand to Sarah’s immediate left.  Sarah was also holding a silver reflector to her chest angled up to fill shadows under her chin, etc.  As a result, I think that this lighting set up has created a nice modelling effect of Sarah’s face putting a nice shadow under her nose and just over her top lip. there is soft shadow on her left cheek and nice highlights on her right cheek and on parts of her face and nose without any blown out areas.  I believe that the white background helps push the image forward and give is a nice definable edge all the way around.

DSC_4618-form-1-resized

105mm f/2.8, 1/250 sec, f/3, ISO125.

For my second image I chose this low key idea.  Standing on a step ladder above Sarah as she sat below me on a chair, I lit this image using a soft-box above Sarah and to her right with a white reflector to her left but moved a little further away to only give a small amount of fill-light to her left side.  I reduced the power down to 1/128 on the speedlight and exposed for the highlights.  I believe that the combination of lighting and depth of field draws the viewer through and down thus creating a sense of a three dimensional depth to the picture.

Texture

DSC_4657-soft-resized

85mm f/1.4, 1/250sec, f/2.8, ISO125.

Soft – In this exercise, I have photographed for a soft look.  Using a remote speedlight set to 1/64 +0.3 EV in a large 34 x 34 soft box directly in front of Sarah and set on a stand directly above the camera. By using large diffused flat light source combined with a narrow depth of field I believe that I have produced a much more flattering soft texture to Sarah’s face.  I chose to position Sara by a window in our kitchen to help provide a natural high key background.

DSC_4793-a-hair-resized

105mm f/2.8, 1/250sec, f/5.6, ISO125, WB flash.

Hard and sharp – A less than flattering portrait of Sarah capturing the texture of Sarah hair and to her skin, the hard edge lighting helps to sharpen the image.  To obtain this image I have used hard strobe lighting, set behind Sarah to the left side and right side of the room.  Sarah also held a reflector in front of her to bounce light on to her face.  I mounted the camera on a tripod, manually focused and operated the strobes via Pocket Wizards.  The Speed light left of camera was set to 1/16 and fitted with a reflector beauty dish with a honeycomb grill attached to direct the light.  The speedlight to right of the camera was set to 1/32 and fitted in to the shell of a 24 x 24 soft-box with a honeycomb cloth grill attached; so as to act as a large direction reflector.  Behind the camera I had set up a black screen to prevent light bouncing back on to the subject from my light green walls.  Behind Sarah I had screened off our French windows to prevent light illuminating the background.

Colour

DSC_4434-Candle-light-resized-a

105mm f/2.8, 1/250sec, f/4, +1step, ISO125, WB – Daylight.

In this deliberate colour cast image, I set the WB to daylight but illuminated the scene using a camera mounted speedlight set to 1/8 with a ‘Oklahoma yellow’ Rogue Gel attached and the speedlight was fitted inside a small soft-box and aimed to bounced off the ceiling from Sarah’s right to suggest that her face is being illuminated by the candle which is in fact just a prop.

DSC_4103-Tricolori-resized

105mm f/2.8, 1/13sec, f/3, ISO-125

My wife is part Italian; so I thought it would be fun to try to incorporate the colours of the Italian flag in this portrait.  Controlled by Pocket Wizards I used three speed lights, two gelled and one plain, I set up white fabric backdrop that was lit on one side with an un gelled speedlight in a soft-box and on the other side a green gelled speedlight inside a soft-box to illuminate to other side of the backdrop.  I then set a red gelled speedlight in to a 24 x 24 soft-box positioned above and at 45 degrees to Sarah’s left to illuminate half her face.  I positioned a reflector to Sarah’s right between Sarah and the Backdrop to catch some of the white light and bounce on to her right side for fill light.

DSC_4692-Edit-resized

85mm f1.4, 1/250sec f/1.8, ISO-125 WB-Sunlight.

On reflection – I have decided to replace my image of Sarah lit by two different coloured gels in preference to this picture that on re-reading the criteria, I feel meets the requirements as stated in the brief, that is to choose a lighting and exposure that shows the subject’s colour as strongly as possible.  This image was taken during the same session for obtaining a soft look.  The lighting process and exposures were very similar.  I used a speedlight in a 34 x 34 soft-box set at 1/128; so as not to overpower the natural light coming through the kitchen window.  I feel that this has created an attractive flesh tone and the sunlight has brought out the colour in Sarah’s hair and produced a natural highlight to the side of her face.